Manuals
PolyPlan Resources


PolyPlan Resources
1. Find a distance on your plan. Click “scale” on your top menu bar and enter the distance you’ve chosen for your plan. Click confirm.
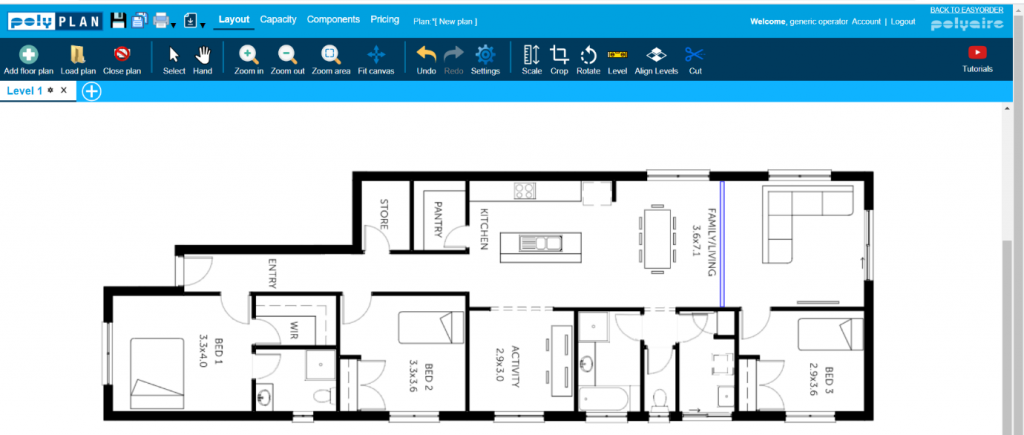
2. Click Scale on your top menu bar and enter the distance you’ve chosen for your plan ie 3600mm. Click confirm.
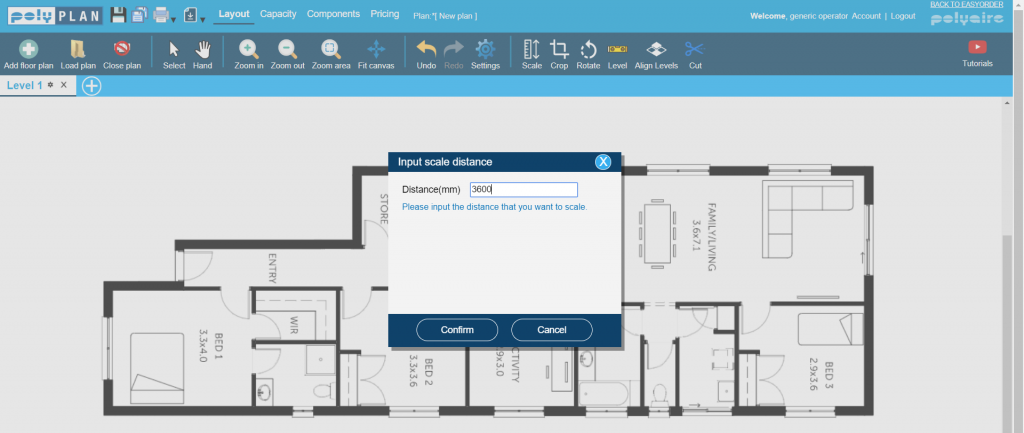
3. Click and drag to draw a line for the distance between the relevant points.

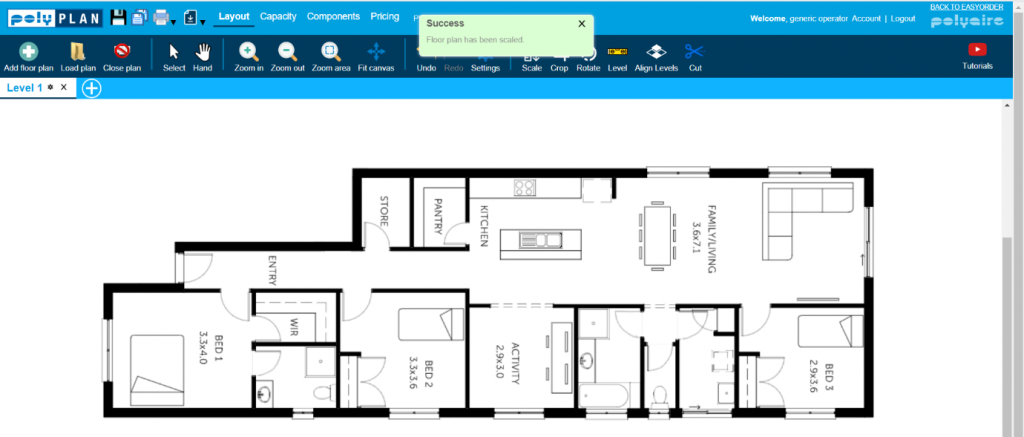
4. A box that says “Floor Plan has been Scaled” will appear. Click OK. Your plan has now been scaled.
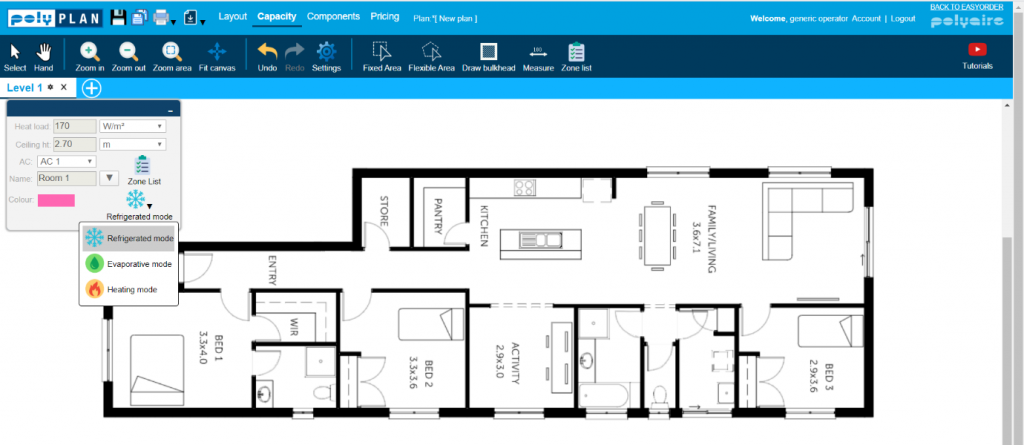
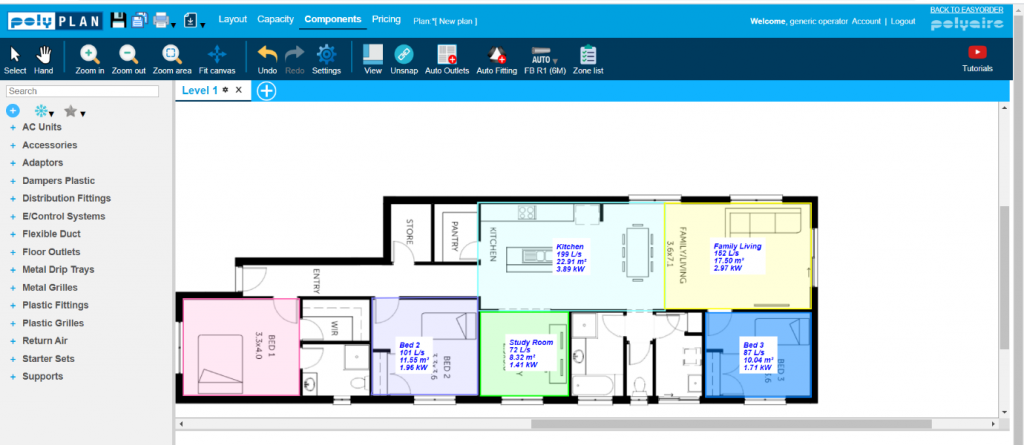
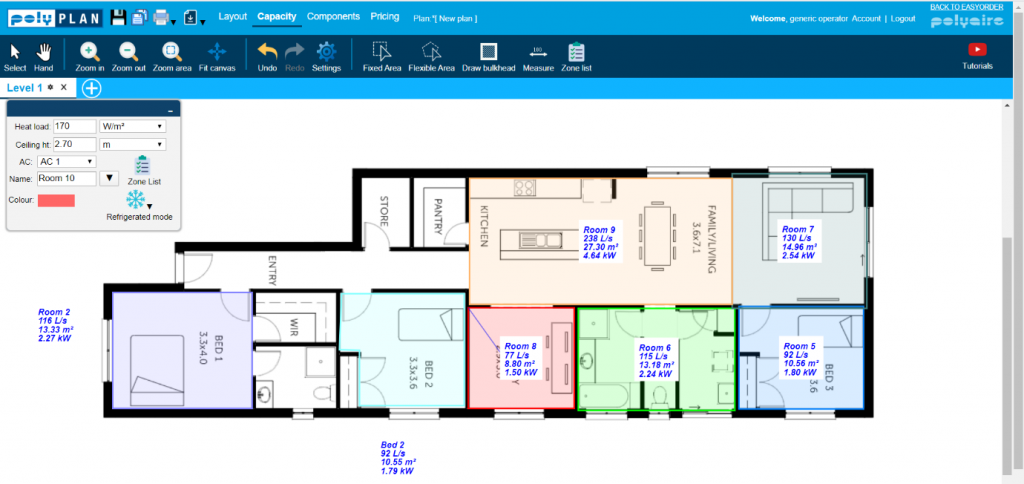
1. Click Capacity tab at the top menu bar. You will see an information window which you can move around for better visibility.
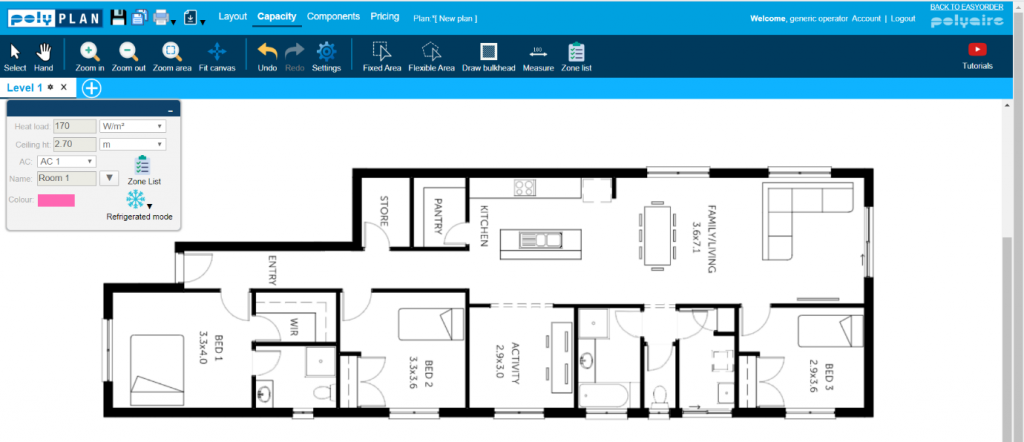
2. Choose the correct installation mode – ducted reverse cycle, evaporative or gas heating.
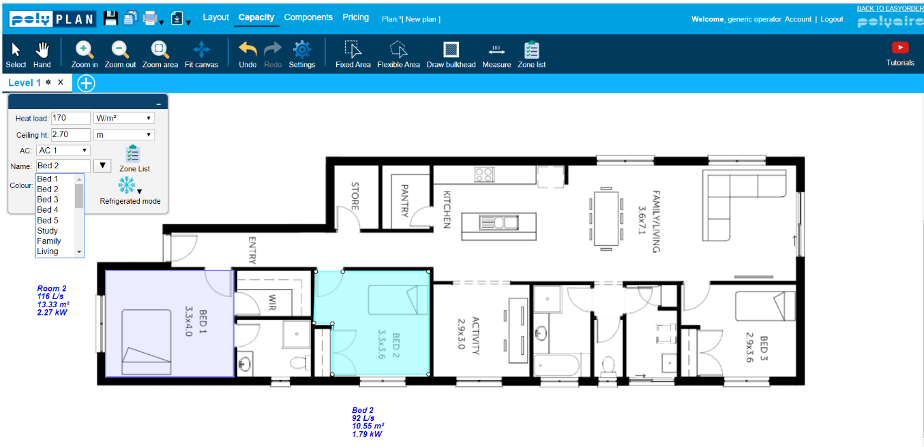
3. Use the Fixed Area tool to click and drag to highlight a square area to set it up as a zone and calculate its capacity requirements.
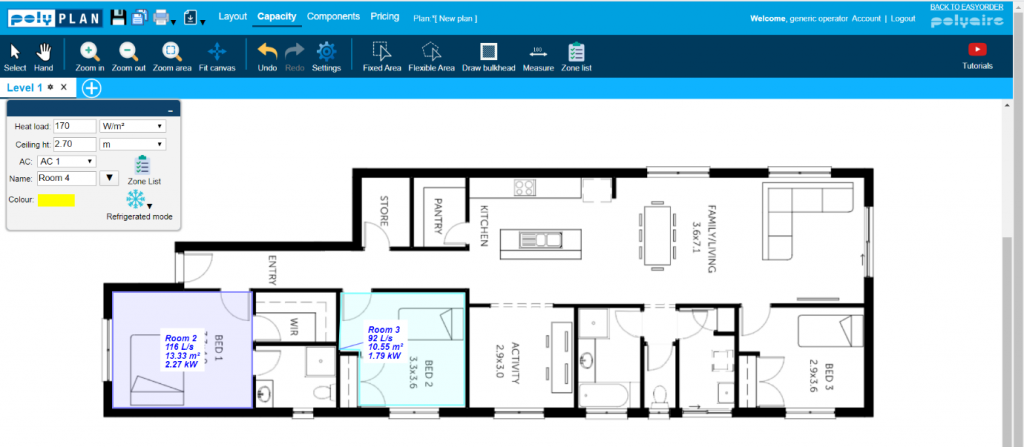
4. Use the Flexible Area tool to highlight a non-square area by clicking the required corner points on your plans.
5. To make adjustments, click on the area you’re set up and tweak the positioning of the corner points.
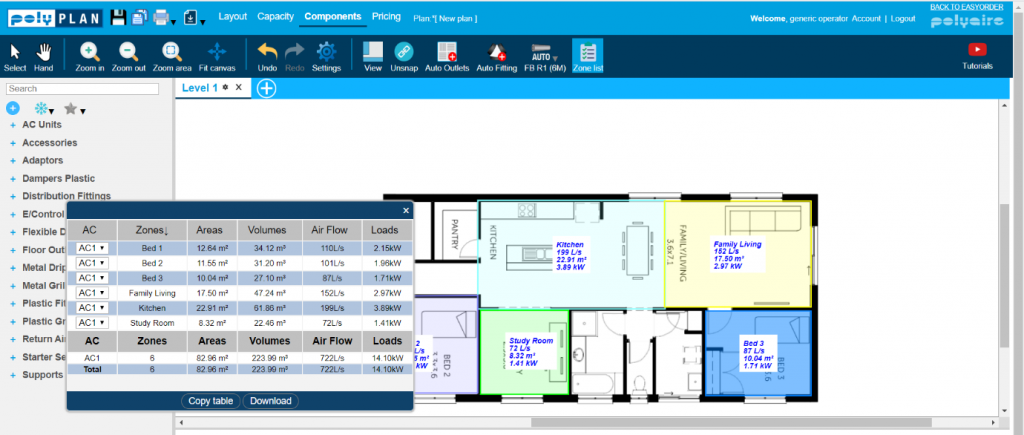
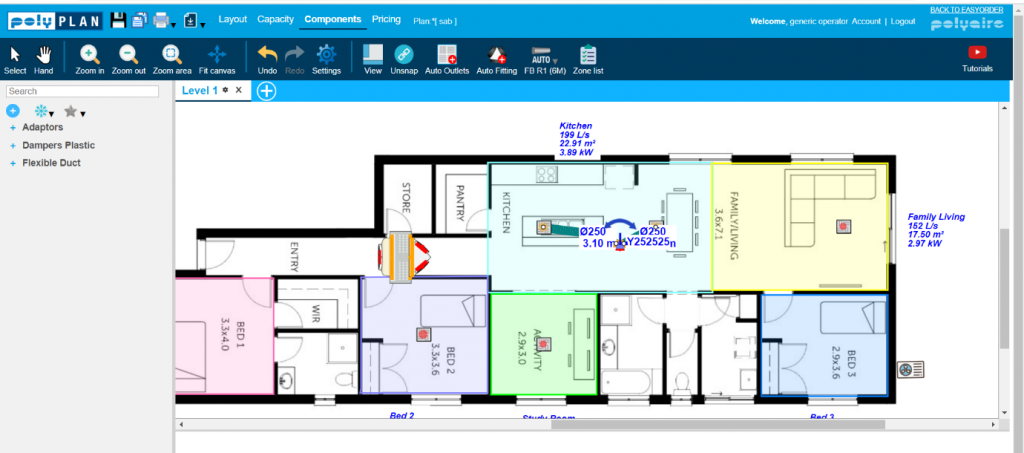
1. Go to Components tab. Load up your Zone List to review your capacity needs.
2. In this case, the total is 14.1kW. So you can quote a 10kW installation basing it on the homeowner only needing to use 60-70% Of the capacity at any one time..
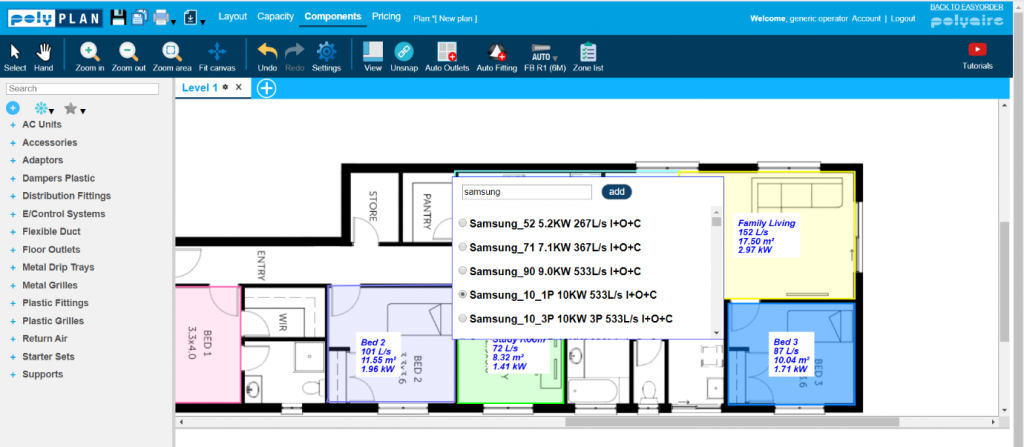
3. Right click roughly on where you want to place the inside unit and click Search To Add. In this instance we are searching for “Samsung 10” and click to Add the unit.
4. The outside and inside unit will appear on your plans.
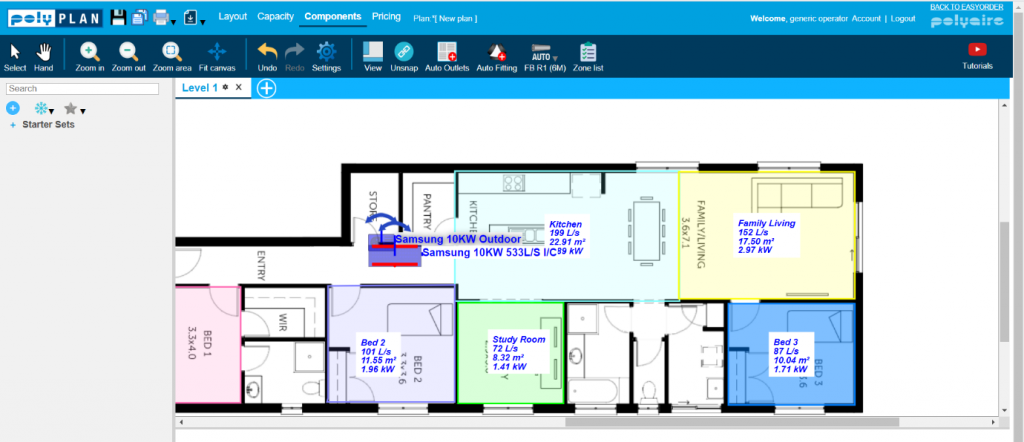
5. You can move the outside unit, outside.
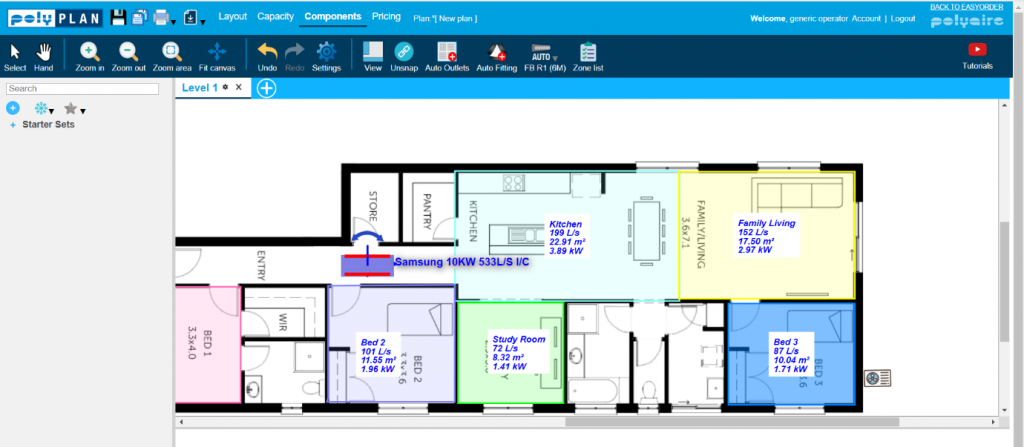
6. You can also rotate the unit or any component. Just right click on it and rotate it.
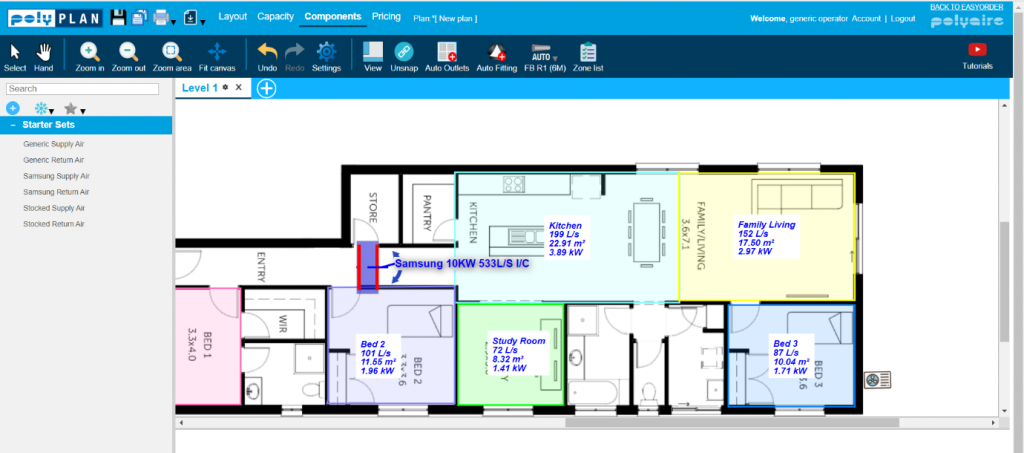
7. Make sure you are selecting the right components. We need a starter set. Click on the unit itself and Polyplan will filter out any starter sets we can’t use for this unit.
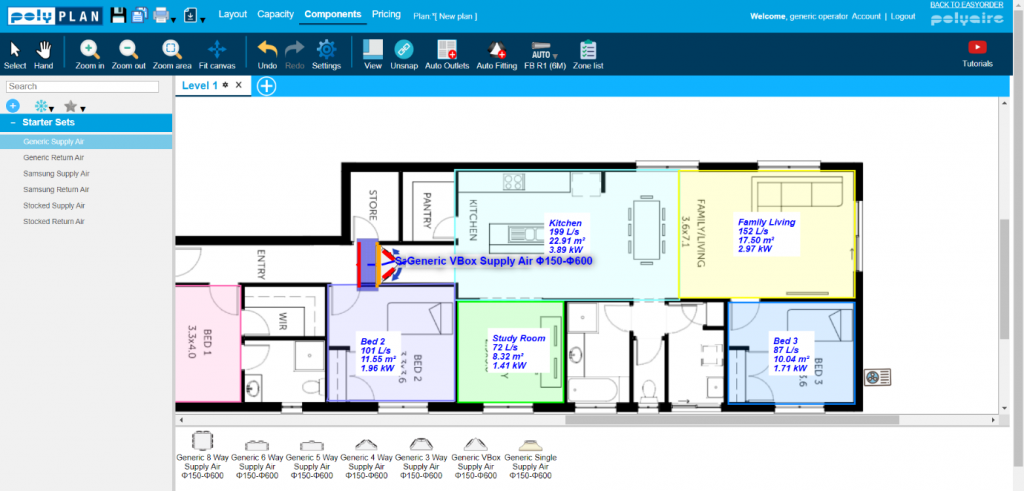
8. We are selecting a Polyaire Generic Starter Set and a Polyaire Generic One-Way Return Air. Click on Generic Supply Air, drag the Generic VBox Supply Air to the connection highlighted green on the unit. This ensures that you’re putting them in the right place.
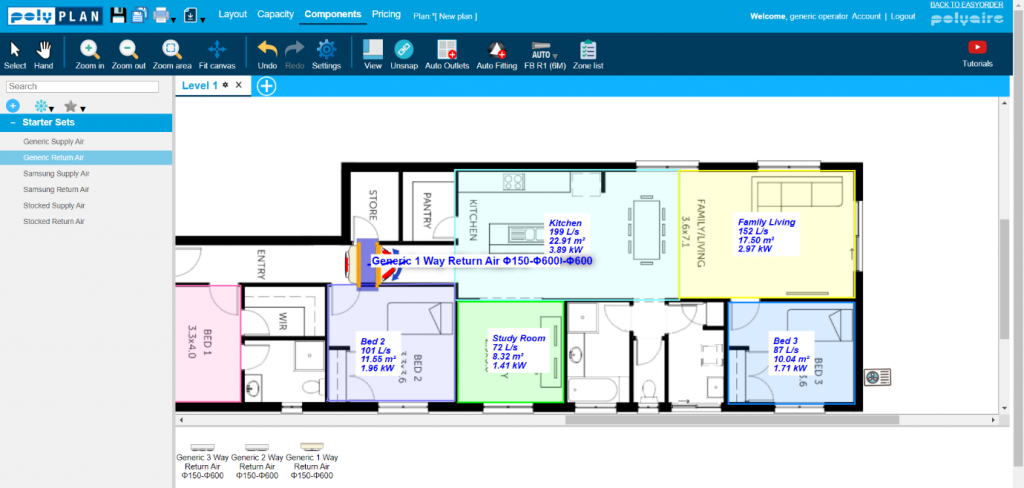
9. Now select Generic Return Air on the left-hand bar and drag the Generic One-Way Return Air to the other green side of the unit.
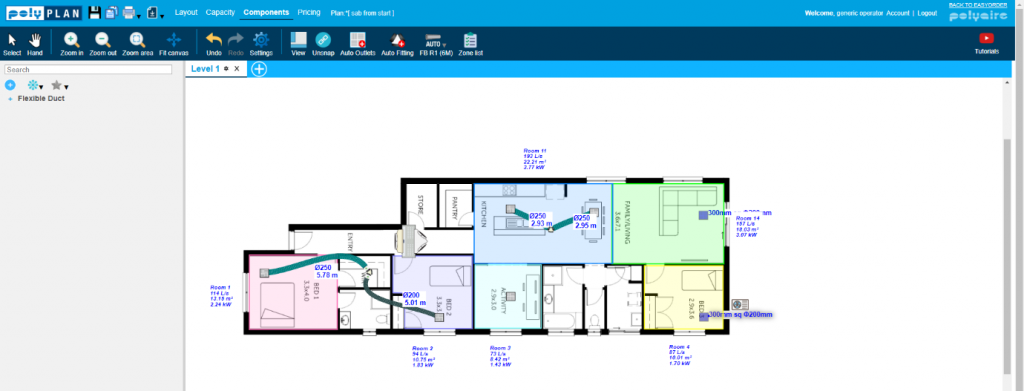
1. First, set up your zones. If you haven’t done it, refer to Calculating Capacity above.
2. Click on the Components tab. At the top menu bar, click on Auto Outlets. Select the type of outlets you want to have on that plan. Click confirm.
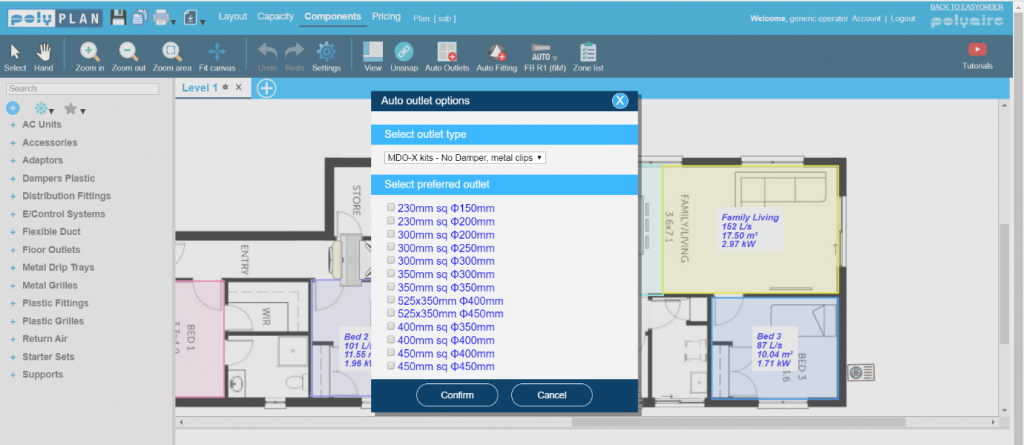
3. Polyplan will automatically place the right size outlet within the parameters you’ve specified in each zone.
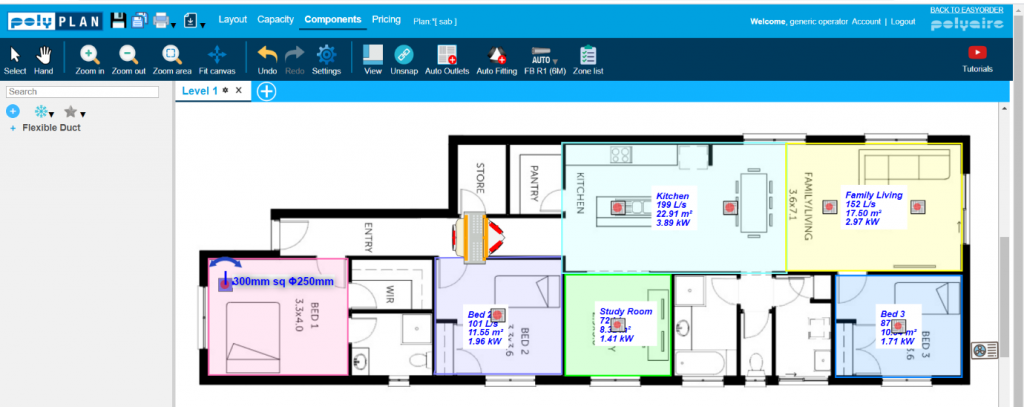
4. You can click and drag them to their optimum position for the best airflow.
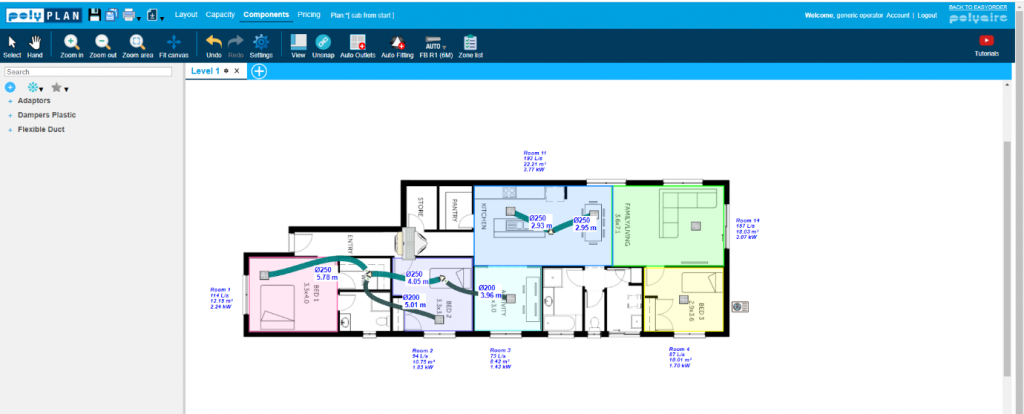
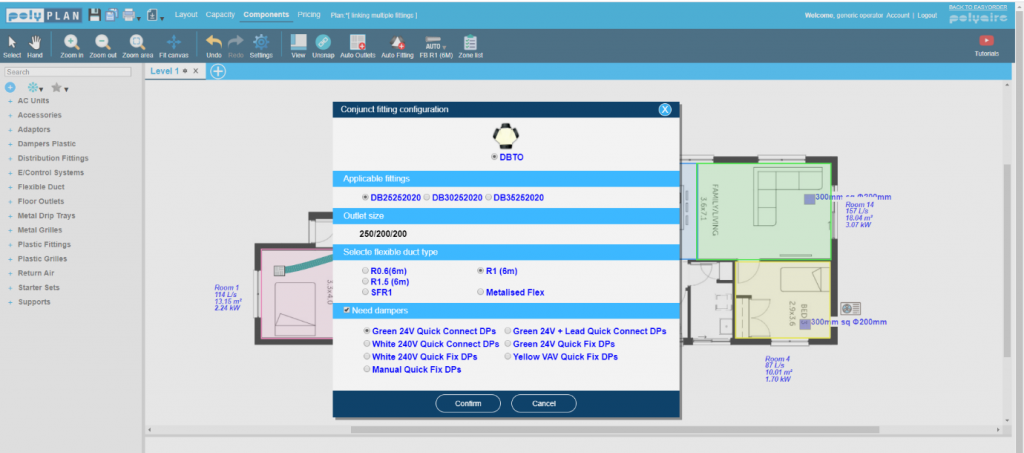
1. Select Auto-Fittings at the top menu bar. Using the cross hairs, select the outlet you want to connect to that fitting then roughly where you want that fitting to be on your plans.

2. A configuration box will appear to recommend the right kind of fittings and flexible ducts.
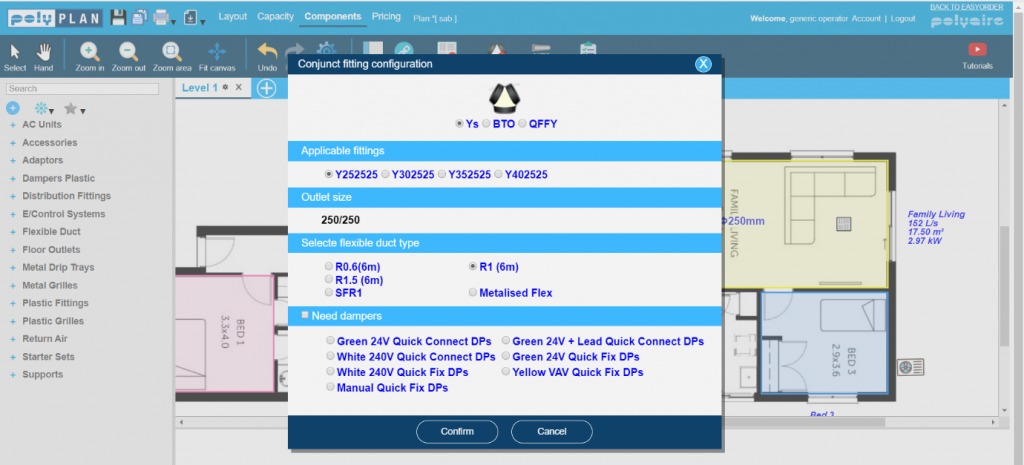
3. Choose your components. In this instance, we have chosen a Y fitting and PolyPlan automatically selected the R1 Flexible Duct. Alternatively, you can select whichever Flexible Duct type you want. These two outlets are in the same zone together, so no dampers are needed to connect to the Y fitting to zone them individually. So you won’t need to check the box which states “Need Dampers”. Click confirm. PolyPlan will now automatically position the fitting with the right size flexible duct connected to the outlets for you.
1. Select Auto Fittings. Here, there are two outlets which need to be zoned and the original Y fitting
2. You can manually select a different “R” rating or diameter and still use the Auto Flex pen to draw the flexible ducts onto your plan.
3. If you need to move the flexible ducts around, double click on it and drag it to where necessary.
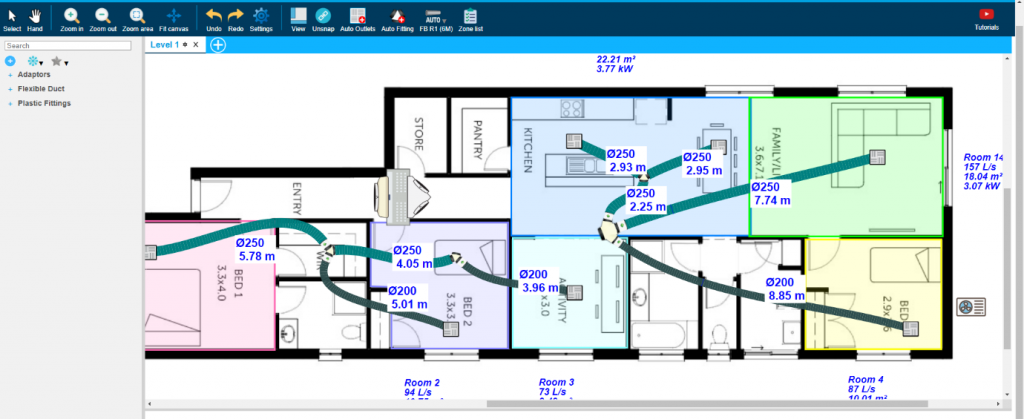
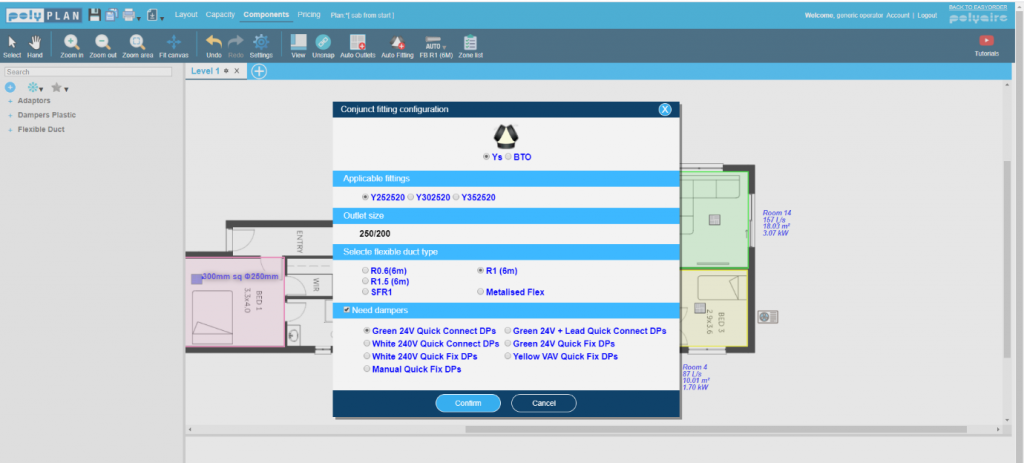
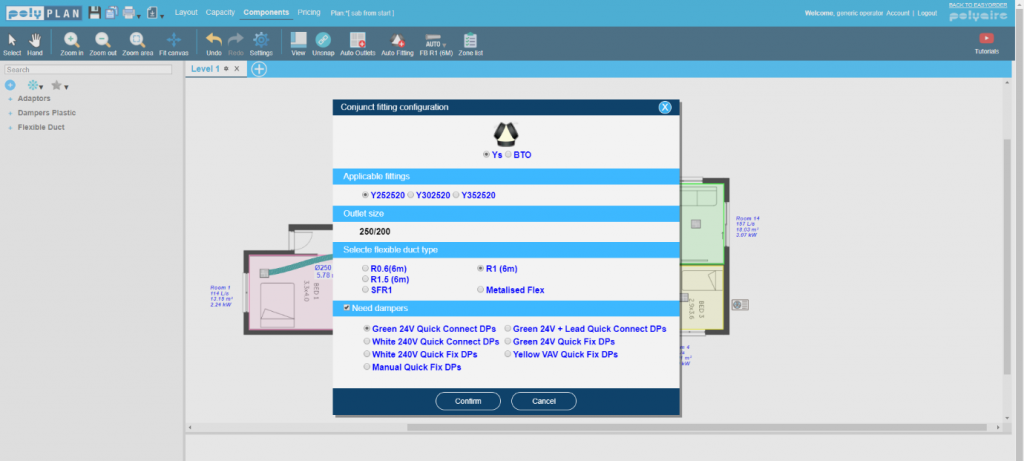
1. Select Auto Fittings. Click on the outlets in the rooms desired and where you want to place the fittings. For example, we’ve chosen outlets in Bedroom 1 and 2. The configuration box will appear.
As these will need to be zoned, dampers are needed so you can check the box that states “Need Dampers”. Click confirm. Polyplan has now placed the Y with dampers attached as well as the flexible duct.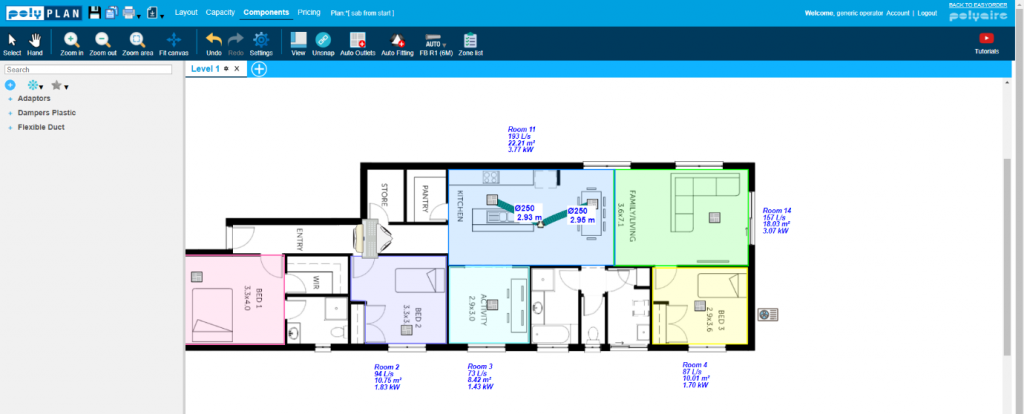
2. Moving a fittings or outlets will also automatically change the required length of flexible ducts.

3. The Auto Fittings tool is smart, and help prevents mistakes in a plan. It will place components only where needed.
4. If you want to link an outlet to a Y that is already zoned by placing a new Y, select Auto Fittings. Choose the outlets that need to be zoned and the original “Y” fitting. Polyplan will recommend the necessary fitting, outlet size and flexible duct type. Click confirm.
5. Polyplan has placed the new Y zoned where it is connected to the outlet but not for where it is connected to the other Y fitting already zoned as we do not need a damper there.